In user experience design (UX design), wireframing is one of the most fundamental steps UX designers take. Wireframes are like blueprints for houses—you’d find it tough to build without one—only the structures you build from them are digital projects. They’re sketches that set out things so you’ve got a visual guide for the layout of the website or app you’re going to create, and an effective wireframe shows where elements will go before you get into any detailed design work, hence why you’ll read all about wireframing here.
After you’ve done your user research, you’ll find wireframing to be one of the earliest stages for your UX design process, and the chief reason for that is how wireframes save you so much—and prevent headaches. Make an effective wireframe and you’ll save time, reduce errors, and make sure you’ve got a clear vision to head towards with your efforts. Not just you, dear designer, but others on your design team and developers and other stakeholders will get to enjoy a clear project view when they’ve got a wireframe in front of them.
Wireframes work like roadmaps for making an effective digital solution, and they’re a huge plus in syncing everyone’s expectations and getting team members on board for a user-friendly digital experience to emerge. They’re cost-efficient, they focus on functionality, and they’re neat and clear deliverables to start the ball rolling on really effective designs.
Show
Hide
video transcript
- Transcript loading…
The Basics of Wireframing
In a wireframe, your goal is to make the best possible visual representation of the workflow of a website or mobile application, but—instead of making a high-fidelity prototype in high and fine detail—you want to illustrate the page’s structure, layout, and functionality so you help plan out the user experience without color, graphics, or content getting in the way and causing distractions. What’s key when you’re making a wireframe is to organize the content in a logical way—the layout should guide the user through the information so an intuitive and pleasant browsing experience happens when they view it without having to hesitate in confusion.
The Elements of a Wireframe
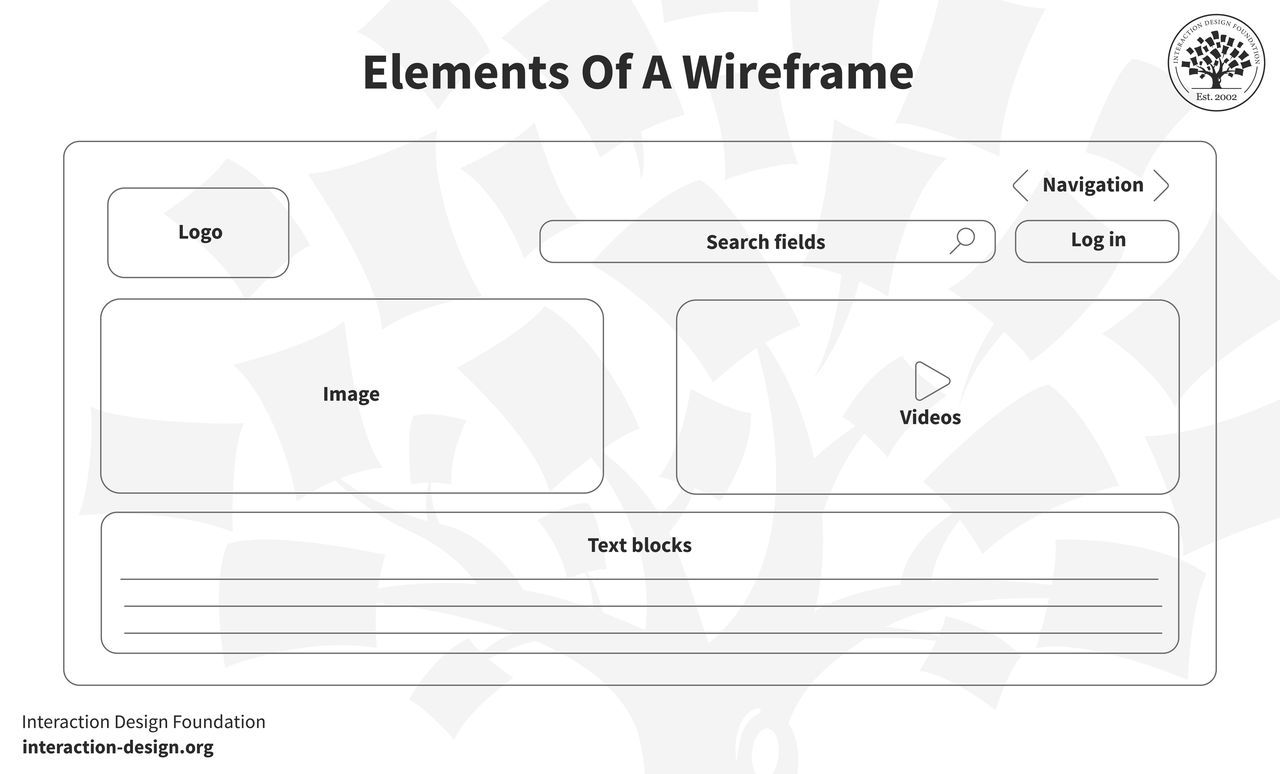
© Interaction Design Foundation, CC BY-SA 4.0
The overall content breaks down into the elements, and first up is the logo, which carries the brand identity and usually sits at the top corner of a page. It’s vital to anchor the brand’s presence and build trust with users. Next, navigation is what helps users explore different parts in the site or app—often appearing as a menu bar or sidebar—and it directs users to primary sections or features so they can get around the design you put before them. After that, search fields are what let users find specific content or features, by typing or speaking if they’ve got mic capabilities, and it’s great to have a search field if a content-heavy site is the plan.
Speaking of typing, text blocks in a wireframe are for content placement—namely, the textual content like headlines, paragraphs, or bullet points. Buttons are, of course, the prompts for users to take actions like “Submit,” “Read More,” or “Buy Now”—whatever the site or app calls for—and they’re vital for users to make calls to action.
Image placeholders are the areas where you’re going to put your visuals, and they help in understanding a page’s content-to-visual balance—and that’s another vital thing to get right for effective designs. And, while we’re in picture-oriented matters here, videos—or video placeholders—save the spot for where multimedia content, such as videos or animations, will go.
You’ve essentially got five principles of wireframing to bear in mind as you create these superb tools to help your UX design process along: simplicity, user-centricity, clarity, feedback loop, and consistency. For simplicity, you keep it straightforward and focus on structure and functionality, while user-centricity refers to how you prioritize your users’ needs and user journeys. Clarity in wireframing means every element should have a clear purpose—another vital thing to get right and what also takes a fair degree of thought—while feedback loop means you keep gathering feedback and iterating to shape the wireframe well. Last—but not least—is consistency, so you keep a uniform structure and design language going throughout.
Different Types of Wireframes
1. Low-fidelity Wireframes
Low-fidelity wireframes—or lo-fi wireframes—are the first ones you create, and they give the basic visuals of the design. Key here is “basic”—and you don’t want scale, grid, or pixel accuracy, because the aim is to have no distractions, but instead to help find simple images, block shapes, and placeholder text.
An example would be if you, dear designer, were in a room with stakeholders and clients, and wanted to sketch an app layout on paper, and these wireframes wouldn’t just ease discussions but help set navigation and outline users’ paths, too. You’d sketch ideas with a pen in this meeting, and with a great deal of product ideas coming to or at you, low-fi wireframes help you zero in on one; plus, they’d be helpful for initial tests at this level.
2. Mid-fidelity Wireframes
Mid-fidelity wireframes are—of the three kinds—the most prevalent. They’re not “crude” like most lo-fi ones, and they offer a clearer layout view but still leave out visuals like images or specific typography.
What’s key here, though, is that components have got more precision and features stand out, and you can use, for instance, varied text weights to help distinguish between titles and body text. Instead of colors, you use different shades of grey to indicate importance of elements. Mid-fi wireframing is suitable for early product stages, to be sure, but you use digital tools like Miro or Figma to craft these kinds of wireframes.
3. High-fidelity Wireframes
True to their name, high-fidelity wireframes—or hi-fi wireframes—are detailed and give pixel-specific layout views. Instead of placeholder text (“lorem ipsum”) and symbols which you’d more likely find in lo-fi versions, here is where you present actual images and relevant content. That level of intricate detail makes these wireframes good to explore and record complex ideas with.
To take detailed menu systems or dynamic maps as an example, this is where designers reserve hi-fi wireframes for the design cycle’s advanced stages—and it’s through these that they refine and finalize design concepts in sharp relief, so they save the “best” until last in that sense.
When to Use Wireframes?
Explore the initial idea: At the start of a project, wireframes help designers and design teams visualize rough ideas and bring abstract concepts to life.
Collect meaningful feedback: Before you get right down into the details of a design, wireframes can help you get in that vital initial feedback to see if you’re on the right track. Stakeholders, members of the design team, and potential users can provide valuable insights so you’ll be better placed—and more clued up—to revisit, tweak, or discard things before you move on to the next step.
Plan functionality: Wireframes map where you’re going to put functional elements—like buttons or interactive features—and it helps you understand how to create an interaction design for usability, and one that will work well.
Show Hide video transcript- Transcript loading…
Structure content: Wireframes help you plan where content will appear from early on—and so they make it easier, for instance, to position text, images, or multimedia so that you’re not left wondering about where to put these later on.
Customer journey mapping: Wireframes are effective tools to plot user journeys with, and they’re a great way to enable designers to envision how users are going to navigate a site or app and experience it in that way.
Usability testing: Before you move on and get anywhere near your final designs—or even high-fidelity prototypes (prototypes are more involved design deliverables where, say, while a wireframe shows there’s a button, a prototype shows what that button does as an action)—wireframes can work as wonderful test “subjects” for you to usability-test with so you can get an early edge to identify and rectify usability issues.
How to Choose the Right Wireframing Tools
Benefits of Digital Wireframing
The precision digital tools have offer accurate measurements, so you can be sure that elements align and match the intended design—so you’ve got an edge over just drawing them on paper.
Author and Human-Computer Interaction (HCI) Expert, Professor Alan Dix explains alignment in this video:
Show
Hide
video transcript
- Transcript loading…
Another massive benefit of digital wireframing is the efficiency they provide you with, since you can speed up the wireframing process with digital and features like copy, paste, and templates, which save time as well as potential headaches from all the labor of hand-drawn efforts. On the subject of saving time, there’s the benefit of easy sharing in that you can share digital wireframes just with a link, and that makes the process of gathering feedback easier, too.
Another point to sharing is sharing in the work on the project, so better collaboration comes with digital wireframing—not least since many digital tools have got built-in collaboration features, and so teams can review, comment, and iterate together in real-time.
With all this efficient work going into a project, there’s always the chance that you and your team will want to check back on different versions of what you’ve done, and that’s where version control comes in, since digital wireframing can help you track changes—with most tools offering version history and allowing designers to compare versions or revert back to old ones.
The difference between prototypes and wireframes came up earlier, but let’s revisit a feature there—of interactivity—and some tools enable clickable wireframes, and that handy feature simulates user interactions by offering them a dynamic preview. Scalability is another big benefit of going digital with wireframes, and it’s just a straightforward matter to adjust wireframe sizes for various devices—so you can also ensure designs are responsive.
Another juicy plus is the factor of integration—and many tools integrate with other design software, and so that streamlines the transition from wireframing to high-fidelity designs. Asset management is yet another benefit, and it’s easy to organize and store assets—not least since icons, components, and UI elements remain at your fingertips.
Last—but not least—there’s the boost of professional presentation, and as digital wireframes look polished, and if you present them to stakeholders or clients, it’ll give a professional impression.
Wireframing tools and software
Wireframing tools help you map the user experience, layout, and overall flow—and put you streets ahead of pen-and-paper sketching (although hand-drawn wireframes can come in very handy in brainstorming sessions and the like). Software for wireframing helps you streamline the design process and ensure everyone is on the same page, so we’ll talk about some of the top wireframing tools leading the industry. (Prices correct at the time of writing.)
1. Figma
© Figma, Fair Use
Figma is a top-tier, cloud-based design tool, and it's a favorite among solo designers and teams alike. Even free users benefit from its comprehensive feature set. FigJam is an online whiteboard, and it integrates with Figma, so you can use it for brainstorming and user flow mapping.
You can transition to wireframing and prototyping within the same platform, and a juicy plus is that there’s no need for external design apps. What’s more, the platform excels at team collaboration with real-time edits and in-file discussions. Developers can extract CSS for smooth transitions to production.
Best Features
Generous free plan
Online whiteboard companion (FigJam)
Seamless team collaboration
Vector-based pen tool
Integrated team conversations
Pricing
Free (3 projects). Professional plan at $12/user/month (annual billing).
2. Mockflow
© MockFlow, Fair Use
MockFlow is an online wireframe tool with real-time collaboration, and its clean, intuitive interface makes wireframing simple with a great many UI packages. The platform has design controls placed on the left—which maximizes the space for the design—and beginners find it easy to use due to the precise placement of its diverse elements.
The platform offers unique features—like organizational functionality—and it allows you to create separate spaces for each project, plus you can export in various formats, too, including Word and PowerPoint.
With native Slack and Microsoft Teams integrations, team communication stays streamlined with Mockflow, and bonus features like AI image and text generators are neat plusses that enhance its capabilities.
Best Features
Intuitive interface
Multiple project management
Diverse design elements
Slack and Microsoft Teams integration
AI image and text generators
Pricing
Free (1 UI project). Wireframing plan at $14/user/month. Product Design plan at $19/user/month.
3. Lucidchart
© Lucidchart, Fair Use
Lucidchart is a diagramming tool that’s accessible via web browsers, and it empowers users to draw, do revisions, and distribute charts and diagrams collaboratively. This platform is ideal for enhancing organizational structures, systems, and workflows, and a user-friendly interface makes it a top choice if you’re after visual collaboration tools.
The platform’s strength is how it promotes teamwork through real-time collaboration, in-app chats, and extensive integration capabilities. Lucidchart syncs with popular tools—including Microsoft Office and Google apps—and it connects with its virtual whiteboarding product, Lucidspark.
Best Features
Vast wireframe template library
Drag-and-drop functionality
Real-time collaboration
In-app chat
Automatic sync and save
Integration with Microsoft, Google, Atlassian, and more
Pricing
Freemium version. Paid plans start at $7.95/month.
4. Miro

© Miro, Fair Use
Miro is a popular and dynamic AI-powered virtual whiteboard platform, and it fosters real-time team collaboration with features like sticky notes, wireframe libraries, and mind-mapping tools.
With its diverse integrations and templates, what also makes Miro a nifty pick is how it provides a holistic solution for brainstorming and design. The free version is pretty generous—and additional perks come with the team plan.
Best Features
Collaborate in real-time on whiteboard
Extensive wireframe library
Versatile mind-mapping tools
Diverse built-in templates
Seamless integration options (Slack, Dropbox, etc.)
Realistic sticky notes for brainstorming
Pricing
Free for up to 3 boards; Team plan at $8/member/month for added features.
More notable mentions: Adobe XD, Balsamiq and Adobe Illustrator.
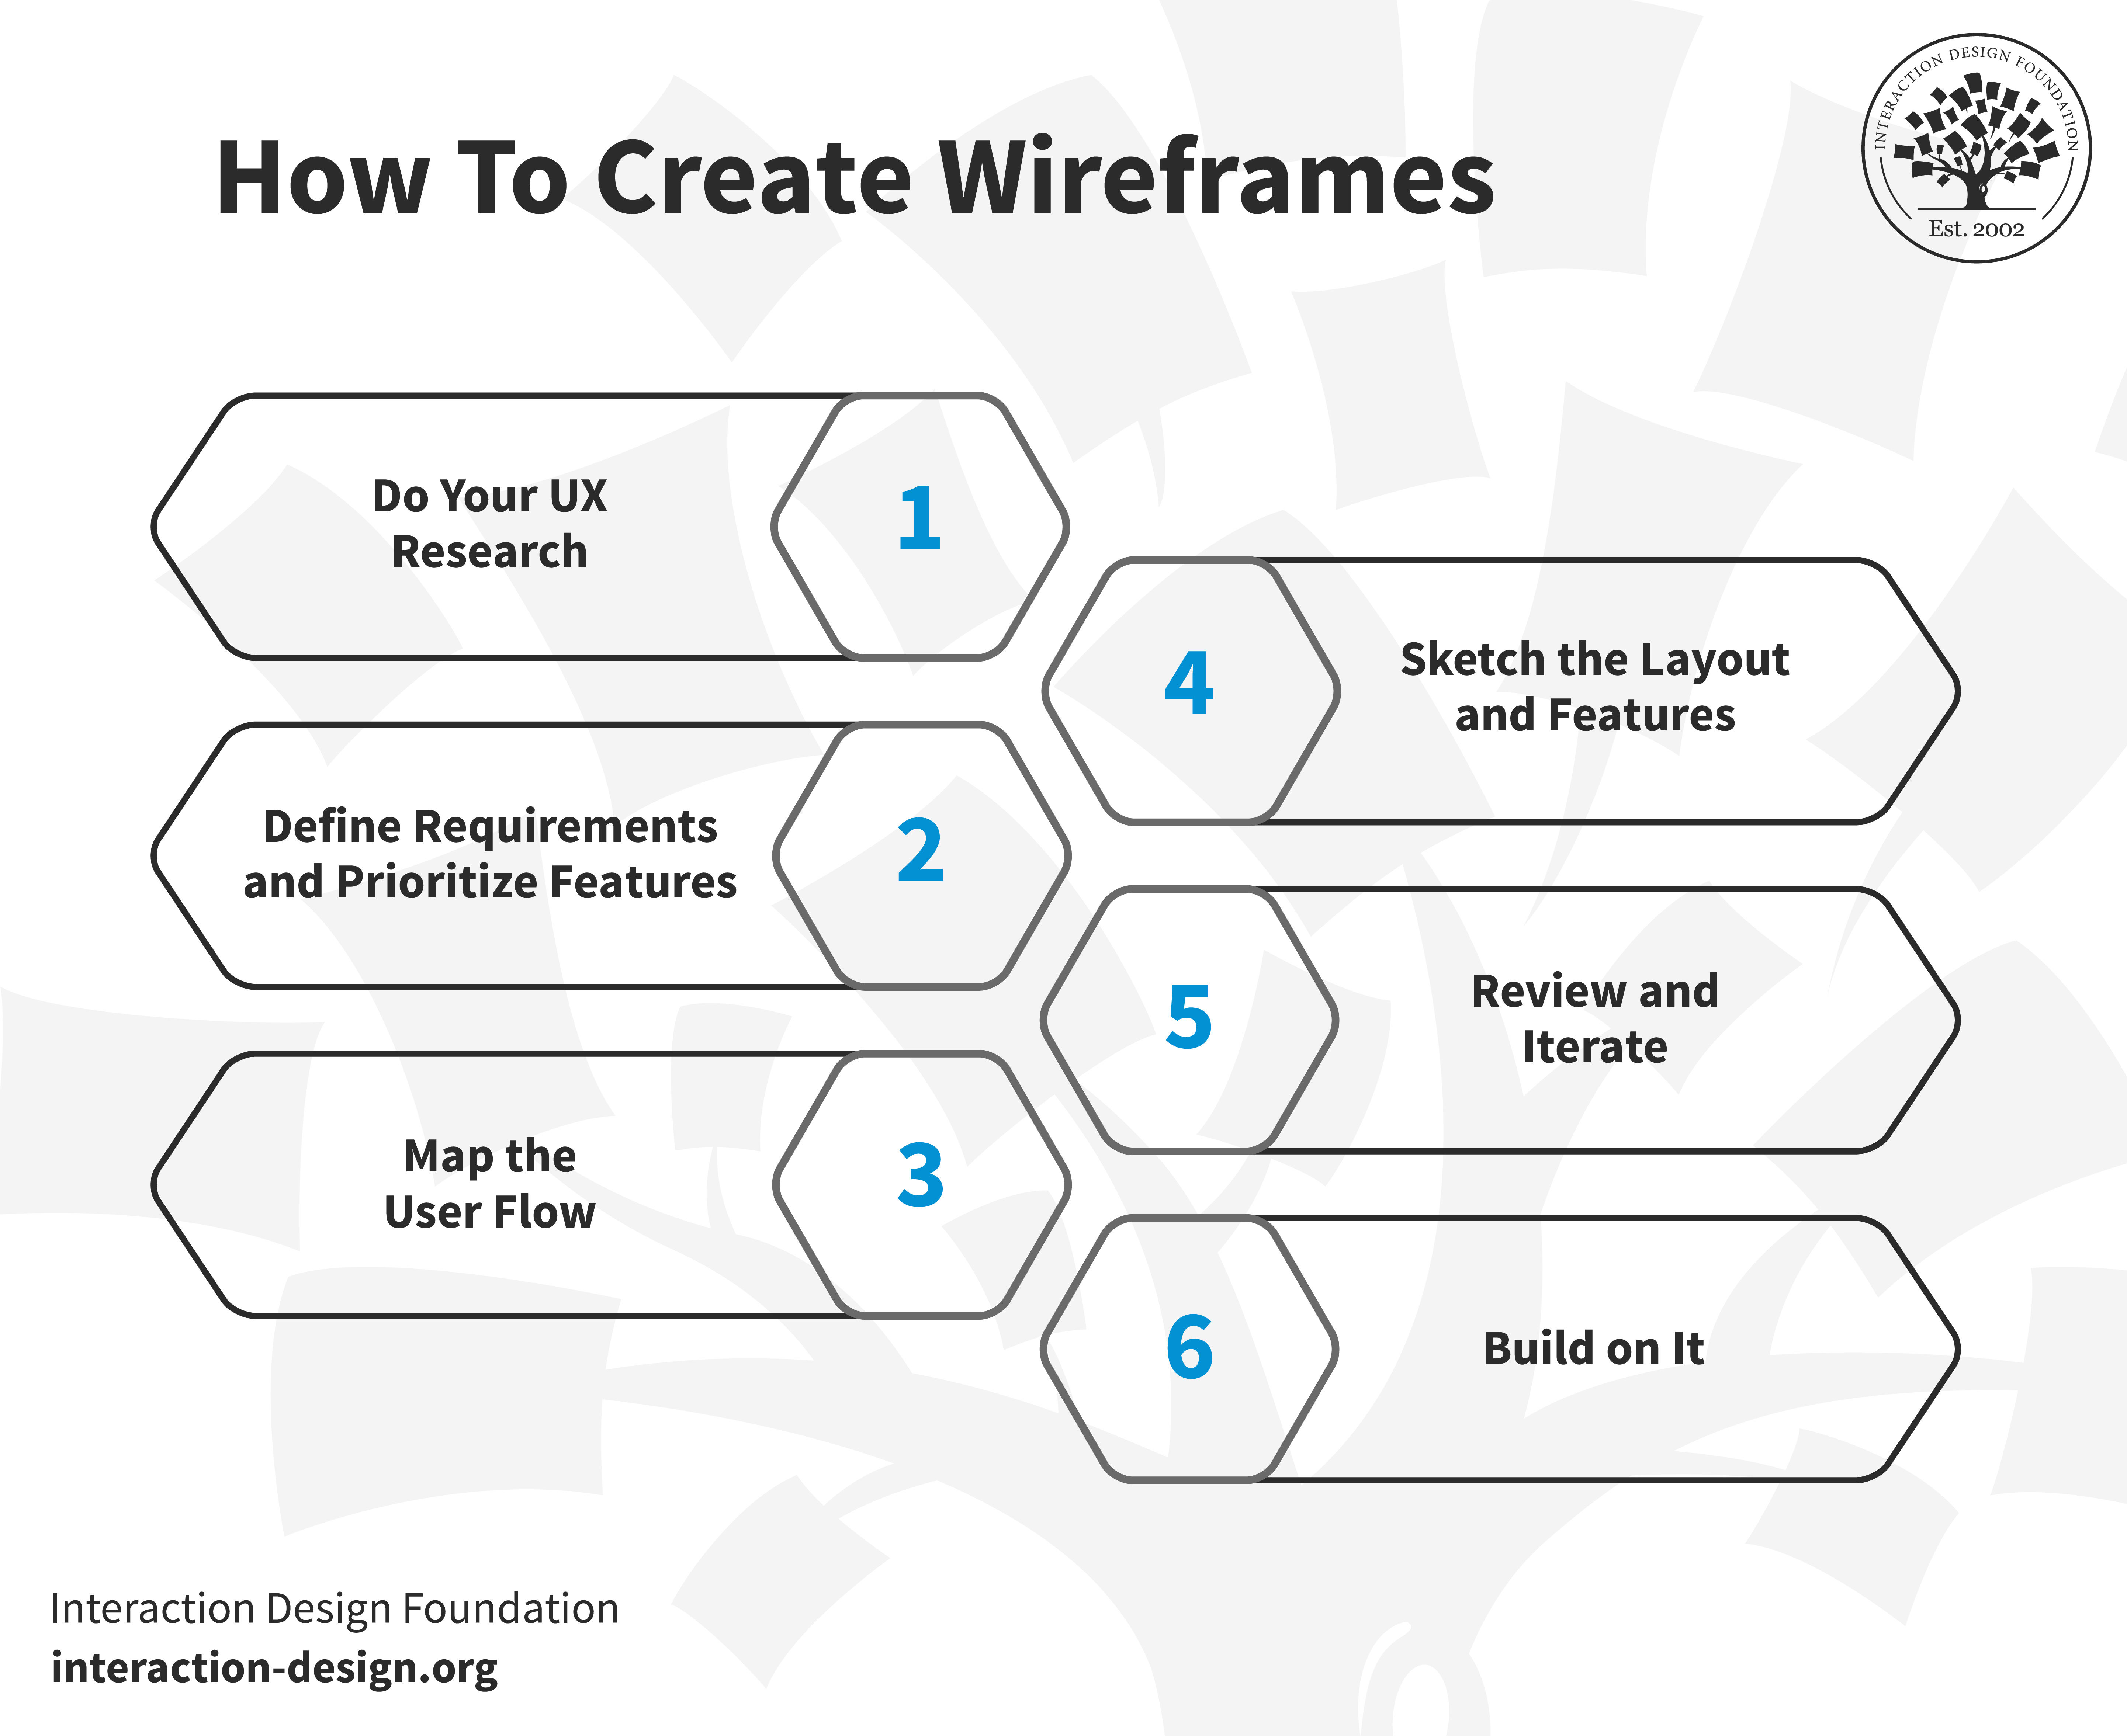
How to Create Wireframes: A Step-by-Step Guide
© Interaction Design Foundation, CC BY-SA 4.0
Step 1: Do Your UX Research
Before you get to sketching, you’ve got to understand your target audience and business well, so be sure to start your UX research from the perspective of your target audience and look at some questions and keep them well in mind about your users, like: What motivates them? What holds them back? Which products resonate with them? If you get tools like user personas or the jobs-to-be-done (JTBD) framework, you can find them invaluable aids here.
Show
Hide
video transcript
- Transcript loading…
As you’re doing this, make yourself familiar with the business side—and understand what you offer, the goals you’ve set, and what your desired outcomes are. This may call for input from your clients or employer brand, but the main point is to balance user needs with business objectives in your wireframe.
Step 2: Define Requirements and Prioritize Features
After you’ve completed your UX research, the next step is to narrow down what to build and here’s where you will need to involve stakeholders or the product owner. They’ll help translate broad user needs into specific features.
For instance, if your brand wants to improve user engagement on its e-commerce site, you can learn from stakeholders about what features align with user needs and business goals if you’re to design a “Recommended Products” section.
You’ll find this step a crucial one for deciding what elements will make it to the wireframe, so do list prioritized features to help you focus on what’s most important for users and the brand—and it’ll help guide the design process.
Step 3: Map the User Flow
Now you’ll need to envision how a user’s journey on your platform will go, and a user flow is the blueprint for that. If it’s an e-commerce site, a user’s path might begin at the homepage, move to a product search, then select a product, make a payment, and—last, but not least—get an order confirmation. When you’ve got these steps clear in your mind, you’ll be better able to highlight necessary features and make good design decisions from there.
Step 4: Sketch the Layout and Features
Congratulations—you’ve got the user research and project requirements well in hand, so now it’s time to go ahead and sketch the wireframe, so pick a fitting canvas size and start to position elements. Think of it like piecing together a puzzle, and you can shift components until you’ve got a nice and intuitive, user-friendly design in front of you, and as you’re working on this, think about some things like information architecture, interactive elements, static elements, and your fidelity choice. For information architecture—IA, for short—focus on how to organize the content and prioritize information based on its significance. For interactive elements, highlight buttons, links, and other clickable items; while for static elements, don’t forget foundational parts like headers, footers, or menus. As to fidelity level, do you want low-, mid-, or high-fidelity (it’ll largely depend on how early on you are in your design process to work out the detail level of this)?
Step 5: Review and Iterate
Now, it’s time to share your wireframes and get that vital feedback in from stakeholders—and they can, and maybe should, include business professionals and developers. You could run “bona fide” usability tests on your wireframes, too, and see what users make of them. When you collect feedback and gather insights in from users, you can frame your questions so they include broad insights and specific details, and—to help things along in a big way—if you’ve got a variety of wireframe versions, let reviewers pick their favorites.
Here, collaboration is a vital thing—and you, dear UX designer, are a champion for the user’s voice and advocate for a user-centered design while brands have objectives and developers focus on the feasibility side of things. In any case, user testing wireframes is invaluable before you and your team get deep into design or development—wireframes work as a tangible product for users to interact with, early-stage testing that can spot potential usability issues, layout problems, or unclear navigation paths before things start costing.
Step 6: Build on It
Once you’re all agreed on the wireframe design, you can move on to make detailed mockups and interactive prototypes—and then kick things up a gear or three so you can transform them into minimum viable products (MVPs) so you refine the user experience towards a final product that’s both functional and user-centric.
Watch this video to learn about the minimum viable product and how to scope out the MVP:
Show
Hide
video transcript
- Transcript loading…
© Interaction Design Foundation, CC BY-SA 4.0
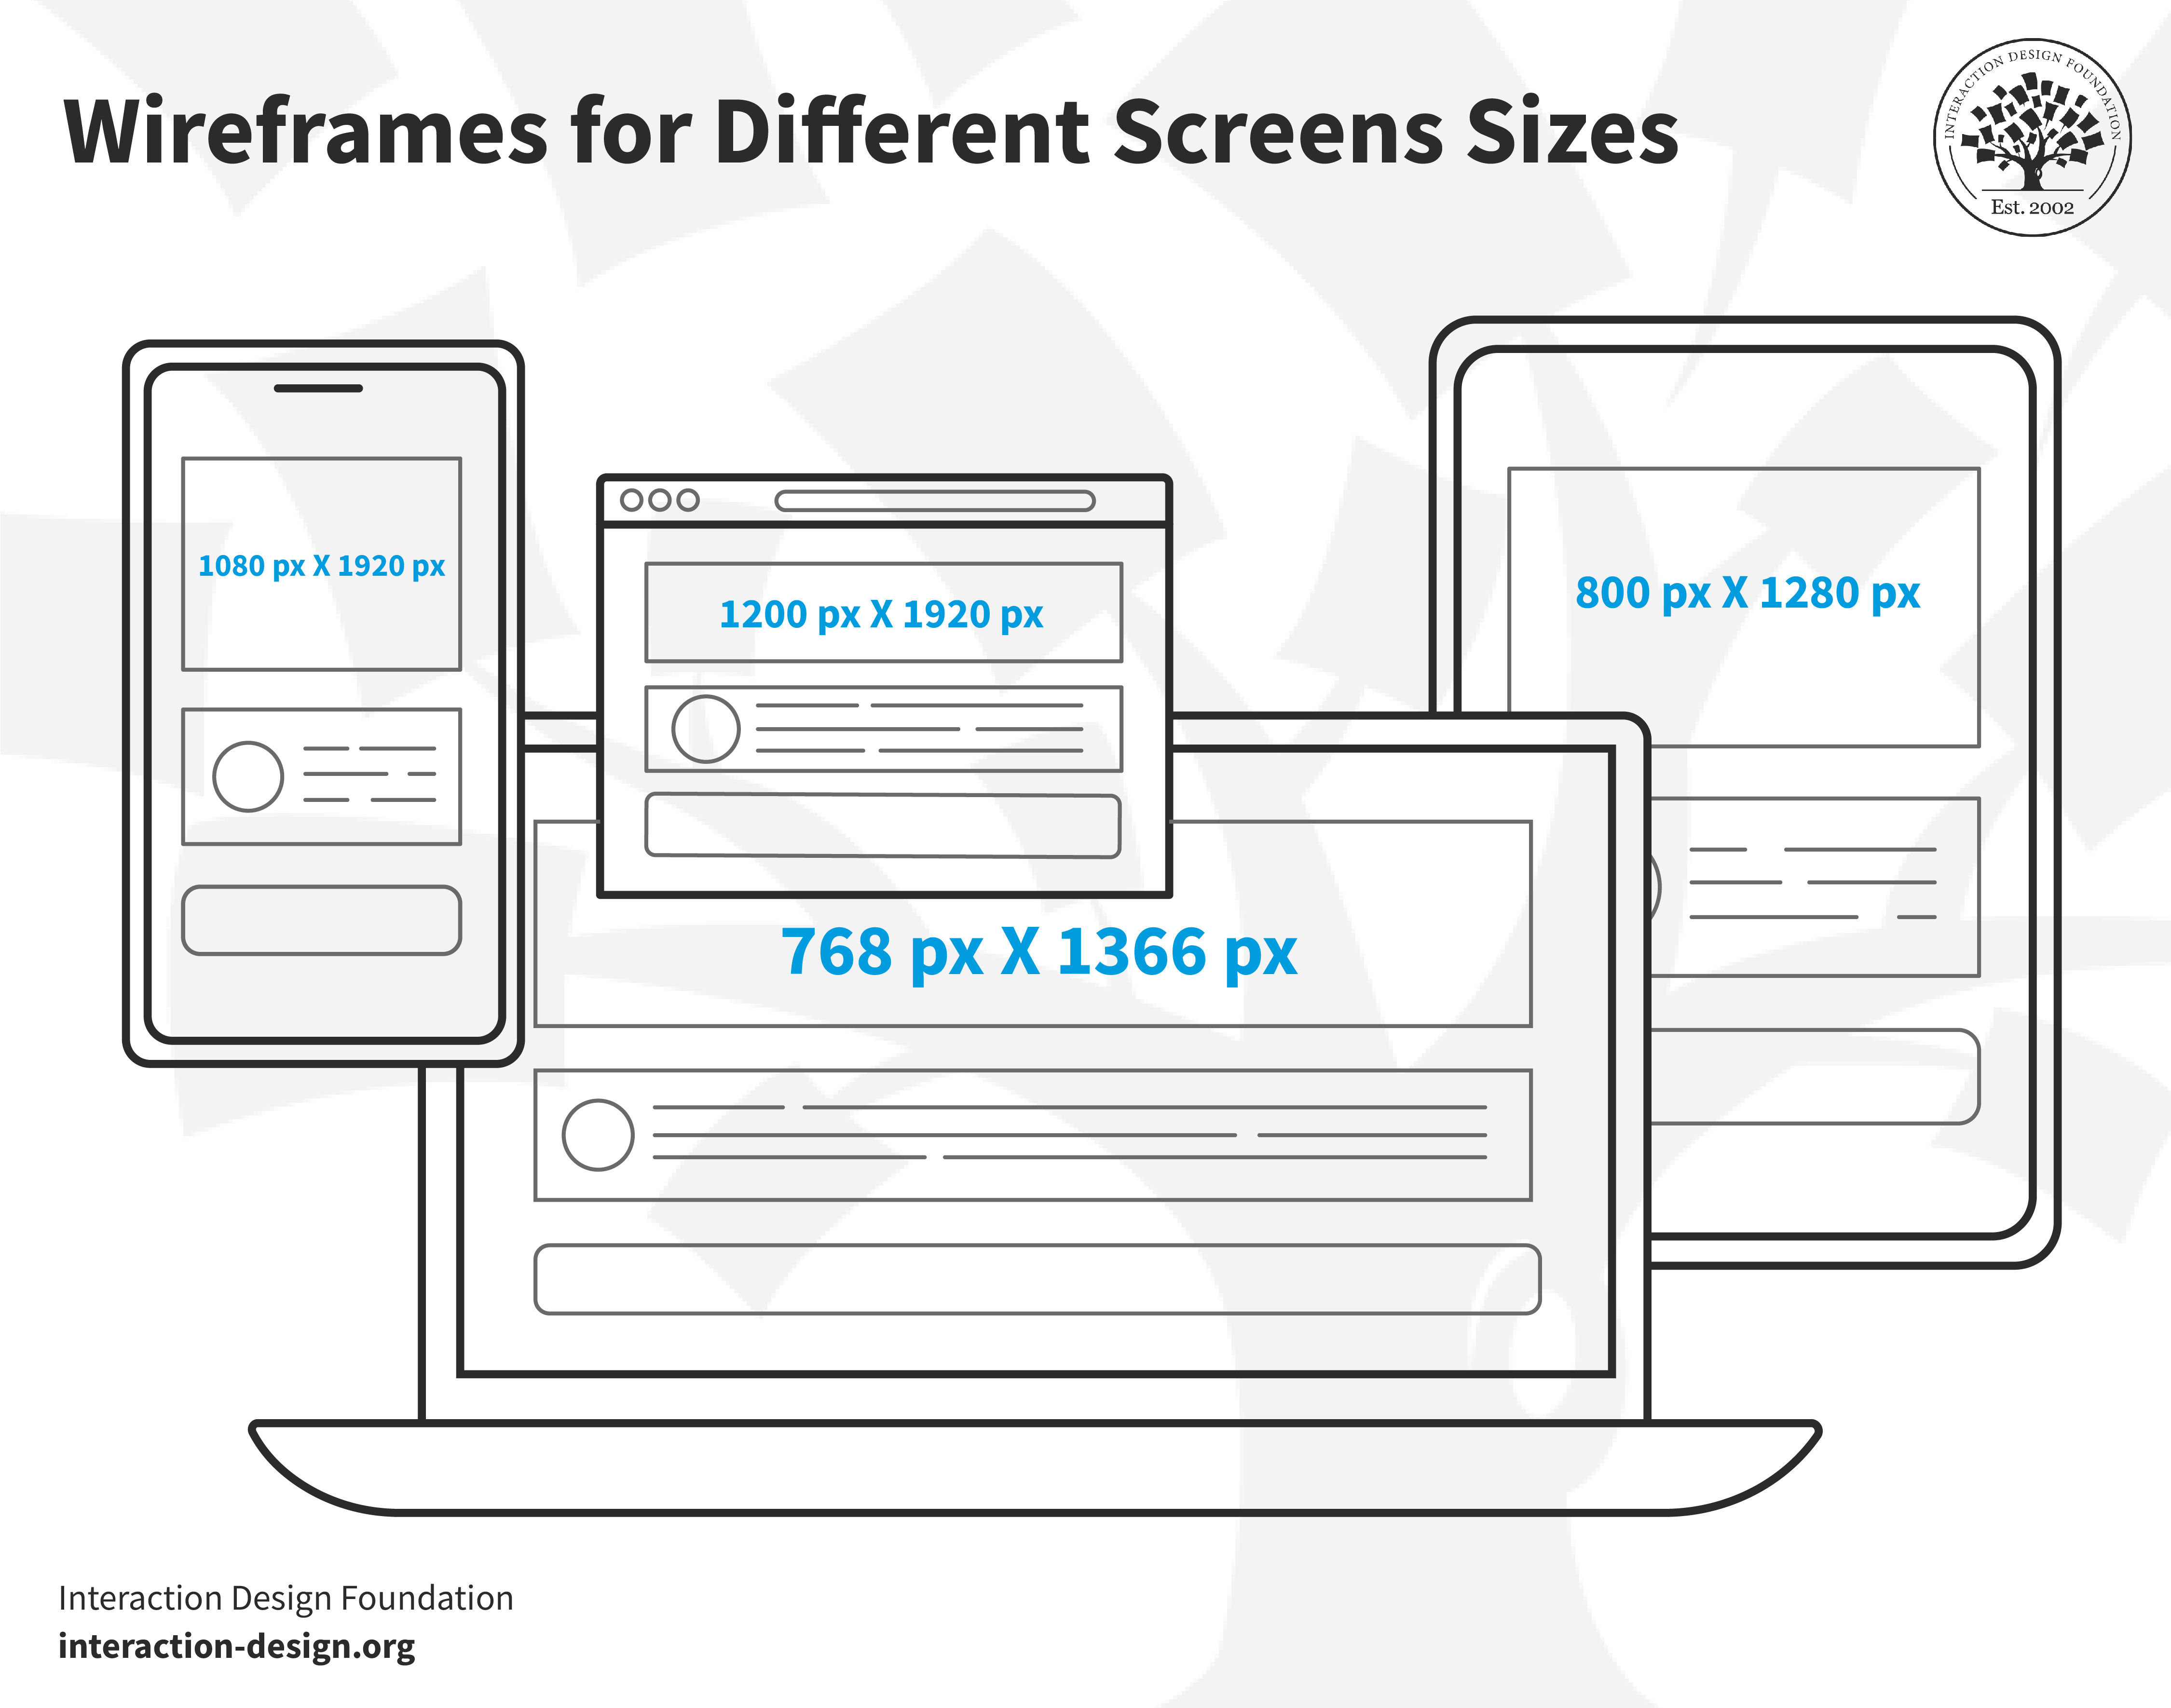
Different platforms have specific wireframe sizes for you to make your skeletal layout for a digital product, and these are:
Smartphone screen: 1080 px x 1920 px
8” Tablet screen: 800 px x 1280 px
10” Tablet screen: 1200 px x 1920 px
Desktop screen: 768 px x 1366 px
Watch this video to learn about the differences between smartphones and tablets:
Show
Hide
video transcript
- Transcript loading…
UX and UI Wireframe Examples
1. Mobile Webpage Sketch
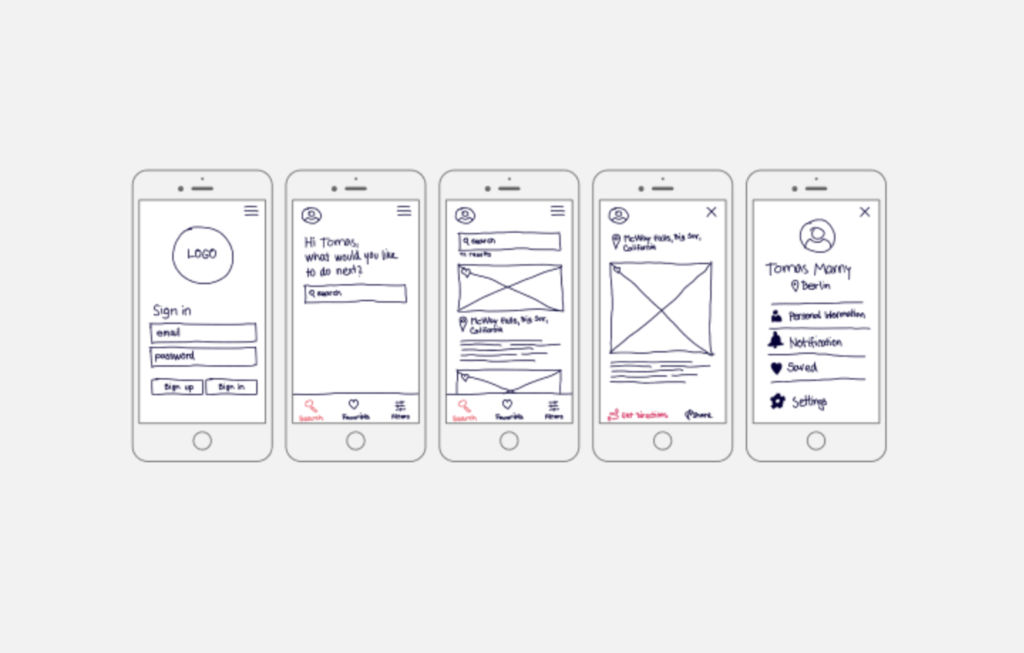
© Miro, Fair Use
This is a hand-drawn app wireframe with detail, and—despite the point it’s got limited detailing, doesn’t capture specific UI nuances or interactions, and isn’t so suitable for complex app structures with multiple layers—it gives context for each step and uses grids for structure. It emphasizes the mobile-first approach, focusing on essential features, and it’s quick to draft and foster iterative design.
2. Classic Blog Website Wireframe
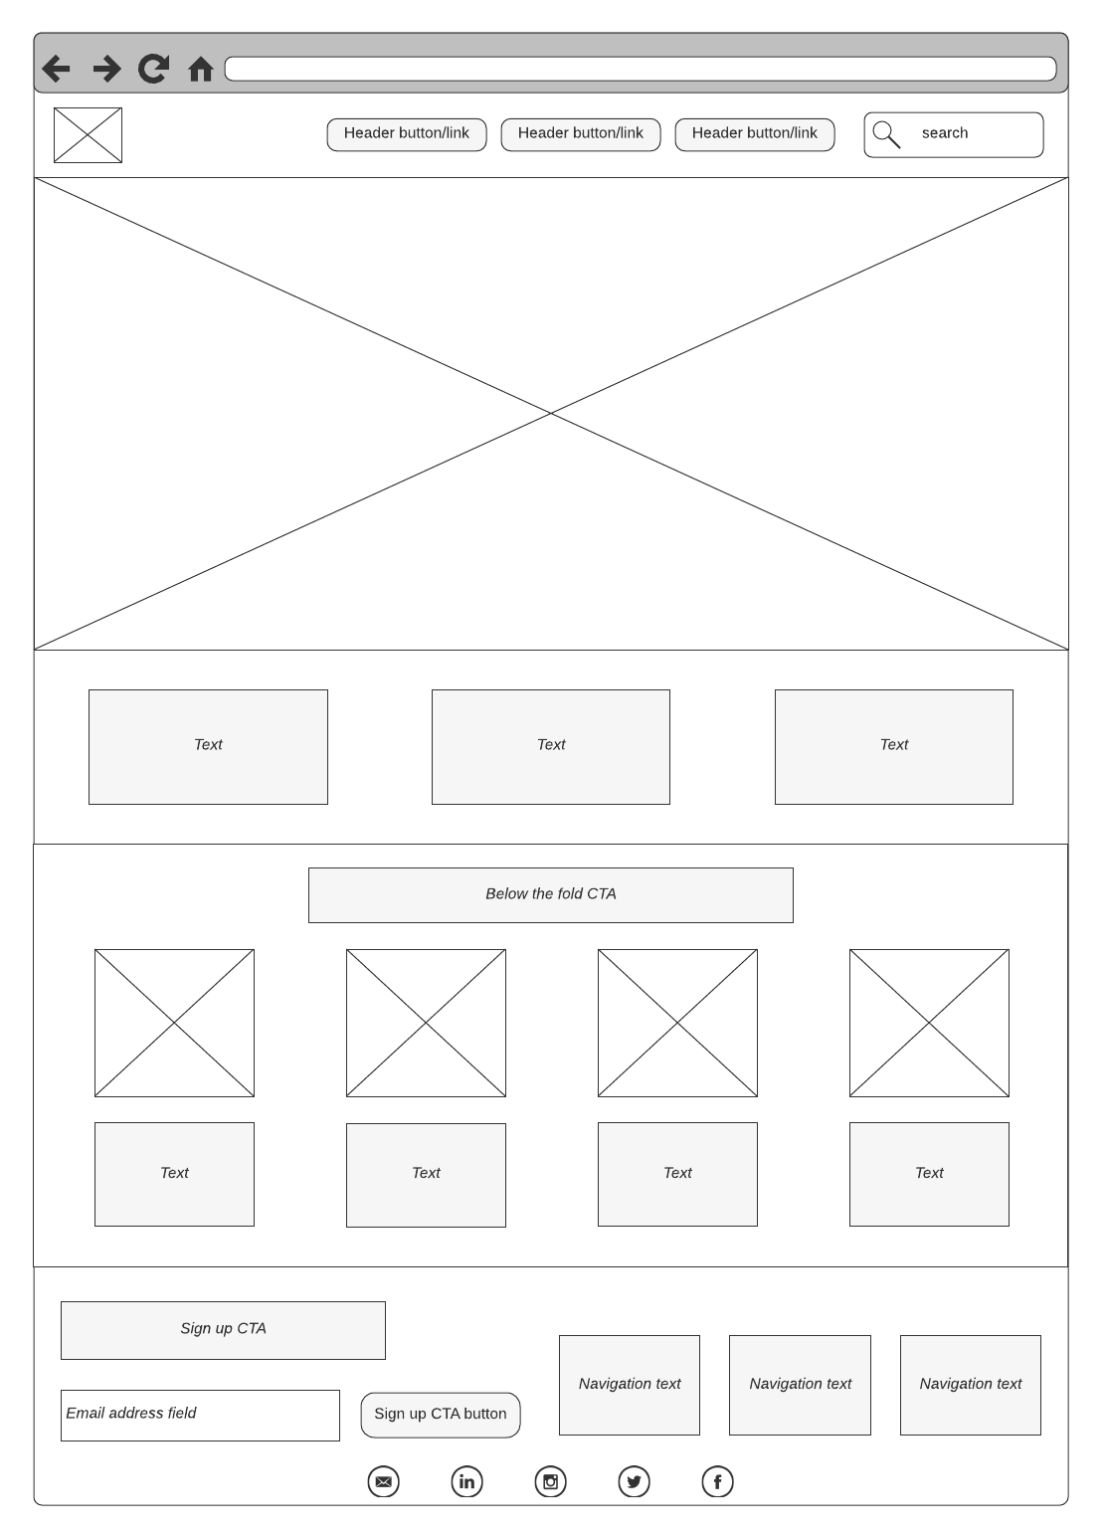
© Lucidchart, Fair Use
A straightforward digital wireframe example above, this one uses basic tags for description. Empty boxes in the wireframe with crossbars indicate image spots in the UI, and—with its distinct placeholders that indicate where images will be, a straightforward layout that supports content-focused designs like blogs and product listings, and a minimalistic design that helps prioritize content hierarchy—this wireframe is an ideal one for blogs and primary eCommerce sites.
3. Branded Food Website High Fidelity Wireframe
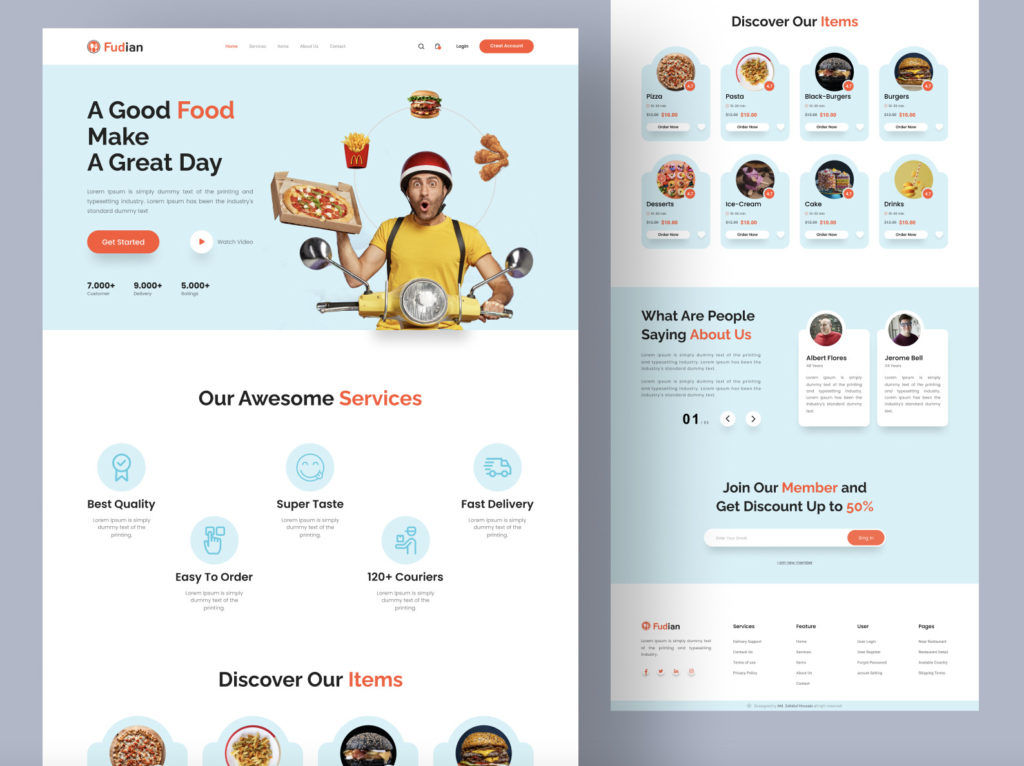
© Zahidul Hossain on Dribbble, Fair Use
A complete wireframe showcasing text, buttons, colors, and images, this one provides a preview of the site’s final look before development. It’s fully detailed with copy, imagery, and design elements, it’s ready for stakeholder review, and it neatly embraces the brand's colors, imagery, and voice for an authentic feel. Last—but not least—a comprehensive representation provides a clear vision for developers. A detailed vision of high-fidelity wireframes reduces ambiguities during the development phase, and it leads to a smoother project flow.
The Take Away
A crucial preliminary step in UX design, wireframing helps in the visualization and planning of a product's structure, and you need a clear understanding of elements, types, and appropriate use cases to create better wireframes—and you've got wireframing tools like Figma, Mockflow, and Lucidchart to support your efforts to make wireframes that work as foundational deliverables for your design process.
You’ve got a step-by-step guide in the form of do your UX research, define requirements and prioritize features, map the user flow, sketch the layout and features, review and iterate, and—last, but not least—build on it.
Wireframe examples also help as stepping stones toward creating the best wireframes of each type for your purpose. In any case, the choice of wireframing—and prototyping—tools can have a great influence on how easy and efficient your design process turns out to be, so it’s vital to pick the right one when you know what your goals are. Effective wireframing can save you a great deal, serve you well, and go a long way towards creating digital solutions that resonate best in the marketplace.