Great design starts with great understanding—if you know the real problems people have, you can build solutions that they love. So, how do you communicate who these people are, their needs, and the challenges they face? You can’t empathize with a 100-page research report. But you can empathize with a persona. When done right, personas don’t just represent your users—they unite your team, sharpen your decisions, and lead you to products, services, and experiences that improve lives and advance your career.
In the rapidly evolving landscape of UX design, one key challenge remains the same: how do you build solutions that truly meet your users’ needs? While tools come and go, the core human-centered skills you need to understand your users and design for them, like empathy, intuition, and creativity, stay the same. Skills no AI can replace. Master user research and persona creation with this ultimate guide, and you’ll increase user love, business success, and your earning potential.
What Are Personas—and Why Should You Care?
Personas are fictional characters rooted in real user research. They encapsulate the needs, pain points, and behaviors of a subset of your audience—specifically, the users you want to delight. Their purpose is to align teams around a shared vision and guide important decisions throughout the design process.
William Hudson, User Experience Strategist and Founder of Syntagm Ltd, explains how personas can transform your work and help your career in this video.
Show
Hide
video transcript
- Transcript loading…
Leave the Myths Behind
Since interaction design pioneer Alan Cooper introduced personas in his 1999 book, The Inmates Are Running the Asylum, many persona misconceptions have arisen. It is important to understand these misconceptions before you begin, as they can lead to personas that do little to improve design processes. Here are several of the most common misconceptions:
Personas should represent all users: If you try to design for your entire range of users, you’ll likely create an overstuffed product that is unfocused and difficult to use. However, when you design for a targeted audience, you build the opposite—a focused product with great usability.
You should have a persona for each user group: This is a similar misconception to the one above. If you create personas for every type of user you have, you will be back where you started. A product built with a persona may only have a certain user group in mind, but there’s great news—it will work well for a lot more people than a product that tries to cater to all. After all, when you design for everyone, you design for no one.
User personas are the same as marketing personas: Marketing personas, also known as buyer personas, focus on buying behavior. Design personas focus on interaction behavior. Unfortunately, marketing (or customer) personas tell us nothing about user behavior. While you may be tempted to take a shortcut and use a marketing persona for product design, this will lead to confused and ineffective solutions.
Step 1. Start with User Research: A Problem Well Stated Is a Problem Half Solved
Without user research, personas are built on assumptions. When we assume our users’ behaviors, we create solutions that solve the problems we think they have, not the problems they really have. Grounded, actionable personas begin with a deep understanding of your users—what they do, what they need, and why.
Many approaches to user research exist; however, one option that minimizes bias and maximizes deep user insight is with grounded theory, user observations, and triangulation.
1.1. Use Grounded Theory
In most approaches to user research, you form hypotheses and test them. Grounded theory, on the other hand, encourages you to explore with an open mind. In this iterative process, you will alternate between data collection and analysis, allowing insights to emerge naturally.
In this video, William Hudson teaches you how to use grounded theory.
Show
Hide
video transcript
- Transcript loading…
If you remain open and curious, you’ll discover hidden patterns in user behavior—insights that form the foundation of credible personas.
1.2. Conduct User Observations
People are notoriously bad at self-reporting. The gap between what users say and what they actually do is often vast. That’s why user observations often work better than user interviews for persona research.
For example, you might ask a user, “Do you follow or skip the tutorial when you use a new app?” In an interview, the user might reply, “I usually skip them as I find them unhelpful.” However, during an observation, you might discover the same user follows four steps of the tutorial and then skips. This insight, if validated by further research, could tell you that your target users prefer a brief tutorial with instructions on where to find advanced guides.
To conduct user observations, you can either:
Watch how users interact in their real environments or in a controlled environment.
Use digital solutions like messaging apps and video recordings.
Send users a cultural probe—a kit containing items like journals, disposable cameras, or task cards—to gather insights into their daily behaviors, experiences, and contexts in a non-intrusive way.
In-person observation is typically the best option. However, it’s not always possible, and digital tools are available. For users who don’t have access to digital options or struggle with them, cultural probes can get close to the observation experience.
How to Record User Observations
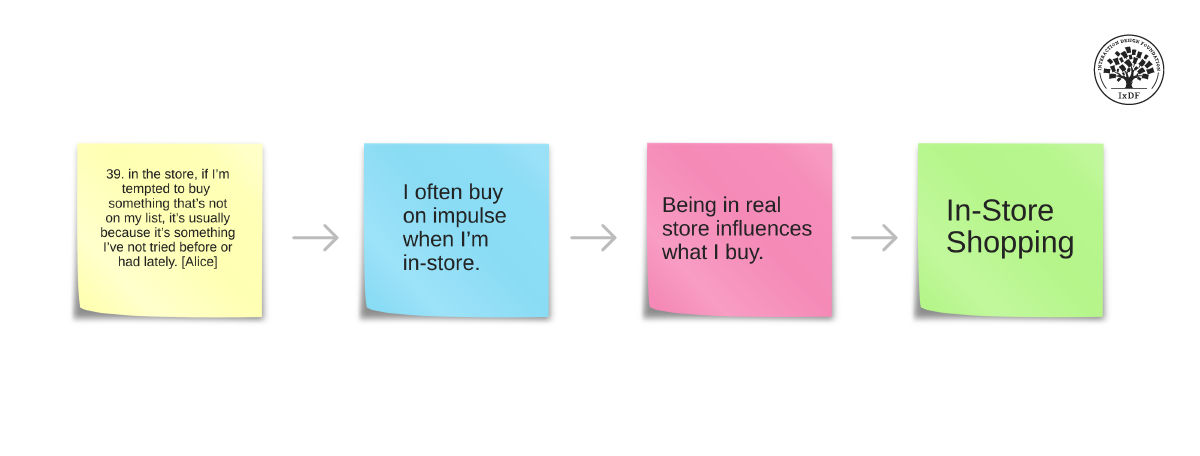
The ideal way to capture data from observations is in the “voice of the customer”. This is where you write notes in the first person as if you were the participant. For example, instead of writing:
“Janet skipped the tutorial and explored the interface herself using trial and error to find her way around.”
You would write:
“I skip tutorials because I prefer to learn by doing and trying things out myself.”
This approach to note-taking fosters empathy. In this video, William Hudson explains how to collect and write these notes. Since you will use them later in an affinity diagram, William refers to them as affinity notes.
Show
Hide
video transcript
- Transcript loading…
1.3. Validate with Triangulation
Observations and interviews are qualitative methods. They typically involve a small number of participants in detailed research. Given this small number, it is important that you validate your findings with a greater number of users using quantitative methods.
For example, if two of your participants reveal they prefer short tutorials with four or fewer steps, you can produce a survey that includes a question like:
How many steps in a tutorial do you prefer?
1–4 steps.
5–8 steps.
9–12 steps.
More than 12 steps.
If your survey confirms that most users also prefer 1–4 steps, this validates your qualitative findings and gives you confidence to include this information in your persona, and consequently, your product.
This approach is called triangulation, and, in particular, methodological triangulation.
The purpose of triangulation is just this—to validate and strengthen your findings. Four main types of triangulation are available to you:
Methodological triangulation: Where you use multiple research methods to validate your initial findings.
Data source triangulation: Where you collect data from different sources (different people, at different times, in different places) to confirm whether your findings apply across multiple types of users and scenarios.
Investigator triangulation: Where you introduce multiple researchers to see if they can reproduce the same data and analysis. If they cannot, then researcher bias may be present.
Theory triangulation: Where you analyze data using different theories to see if the outcome is the same.
You can use one or all of these types of triangulation in your research. Methodological and data source triangulation are the most common in user research, and you can apply them to almost any study.
Step 2. Organize Your User Research with Affinity Diagrams
So you’ve got pages and pages of notes written in the “voice of the customer”. Now what?
This is where affinity diagrams come in—a powerful, collaborative method to make sense of your raw research data. Affinity diagramming helps immerse important stakeholders in the research data and build empathy across the entire project. It is much easier to get your team to use and relate to personas when they’ve helped build them. In this video, William Hudson explains what happens if your team doesn’t use personas:
Show
Hide
video transcript
- Transcript loading…
2.1. Get Started with Affinity Diagrams
In this video, William Hudson guides you through the affinity diagramming process.
Show
Hide
video transcript
- Transcript loading…
Here’s how to get started:
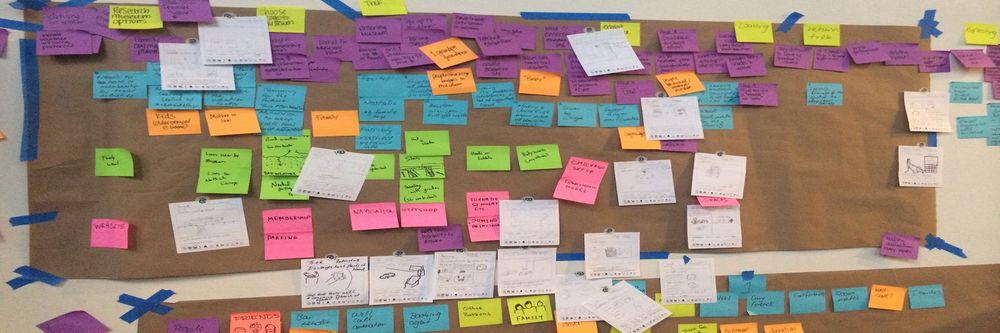
Write (or print) your observation notes on either sticky notes or small index cards. These will be your affinity notes—the raw material for your diagram. They will typically be yellow.
Gather all the people involved in the project who should have direct input into your persona. This might be fellow designers, developers, managers, project leads, or other key stakeholders. You may also invite customer-facing colleagues who have additional insight and context into user behavior.
To begin the process, ask everyone to group the notes with similar observations and themes.
For each group, add a blue note (still in the voice of the customer) that encapsulates the theme.
Once again, group the blue notes and their yellow sub-notes into similar themes under a pink note that is more abstract, but still in the voice of the customer.
For the final green layer, group the pink notes together and write overall categories. Green notes do not need to be in the voice of the customer.
Your yellow, blue, and pink notes should be in the voice of the customer, while the green notes communicate overarching categories. Each layer is more abstract than the last. This approach helps you cluster data and clearly understand the big picture of your users’ behaviors.
© Interaction Design Foundation, CC BY-SA 4.0
Want a quick start guide to affinity diagrams? You can download our free affinity diagram template that takes you through the process step-by-step. Refer to this guide during your affinity diagramming session to stay on track and turn raw data into valuable insights.

2.2. Avoid These Common Affinity Diagram Mistakes
Affinity diagramming is a straightforward technique. However, it doesn’t come without its pitfalls. Here are a few potential issues to watch out for, as highlighted by Maddie Brown from Nielsen Norman Group (NNG):
Vague focus questions: If your team doesn’t know what problem they’re solving, the diagram won’t help. For example, your focus question could be “Why do users abandon the app during or after onboarding?”
Keyword grouping: If groups are based on similar words instead of actual meaning, this leads to shallow insights. For example, participants might group “I don’t understand how to create an account” with “Creating an account takes too long.” While both mention account creation, one reflects a clarity issue in onboarding instructions, and the other concerns efficiency in the registration process.
Groupthink: This can happen when one participant is particularly vocal and enthusiastic. Other members in the group may agree with them just because they’re not as outspoken or don’t have such strong opinions. To avoid this bias, try silent sorting where each participant works independently before reviewing together.
Step 3. Create Your Persona
With your affinity diagram in hand, it’s time to build your persona.
The best personas are not elaborate, novel-length documents. They’re minimal viable personas—clear, concise, and focused on what matters most.
3.1. What to Include in Your Persona
Add the following to your persona:
Name and age: Keep it specific—real people don’t have age ranges.
Photo: Use a realistic image, ideally from user research (with permission).
Primary goals and motivations: What drives them?
Behavioral insights: What do they do, how do they do it, and why?
Context of use: Where and how will they interact with your product or service?
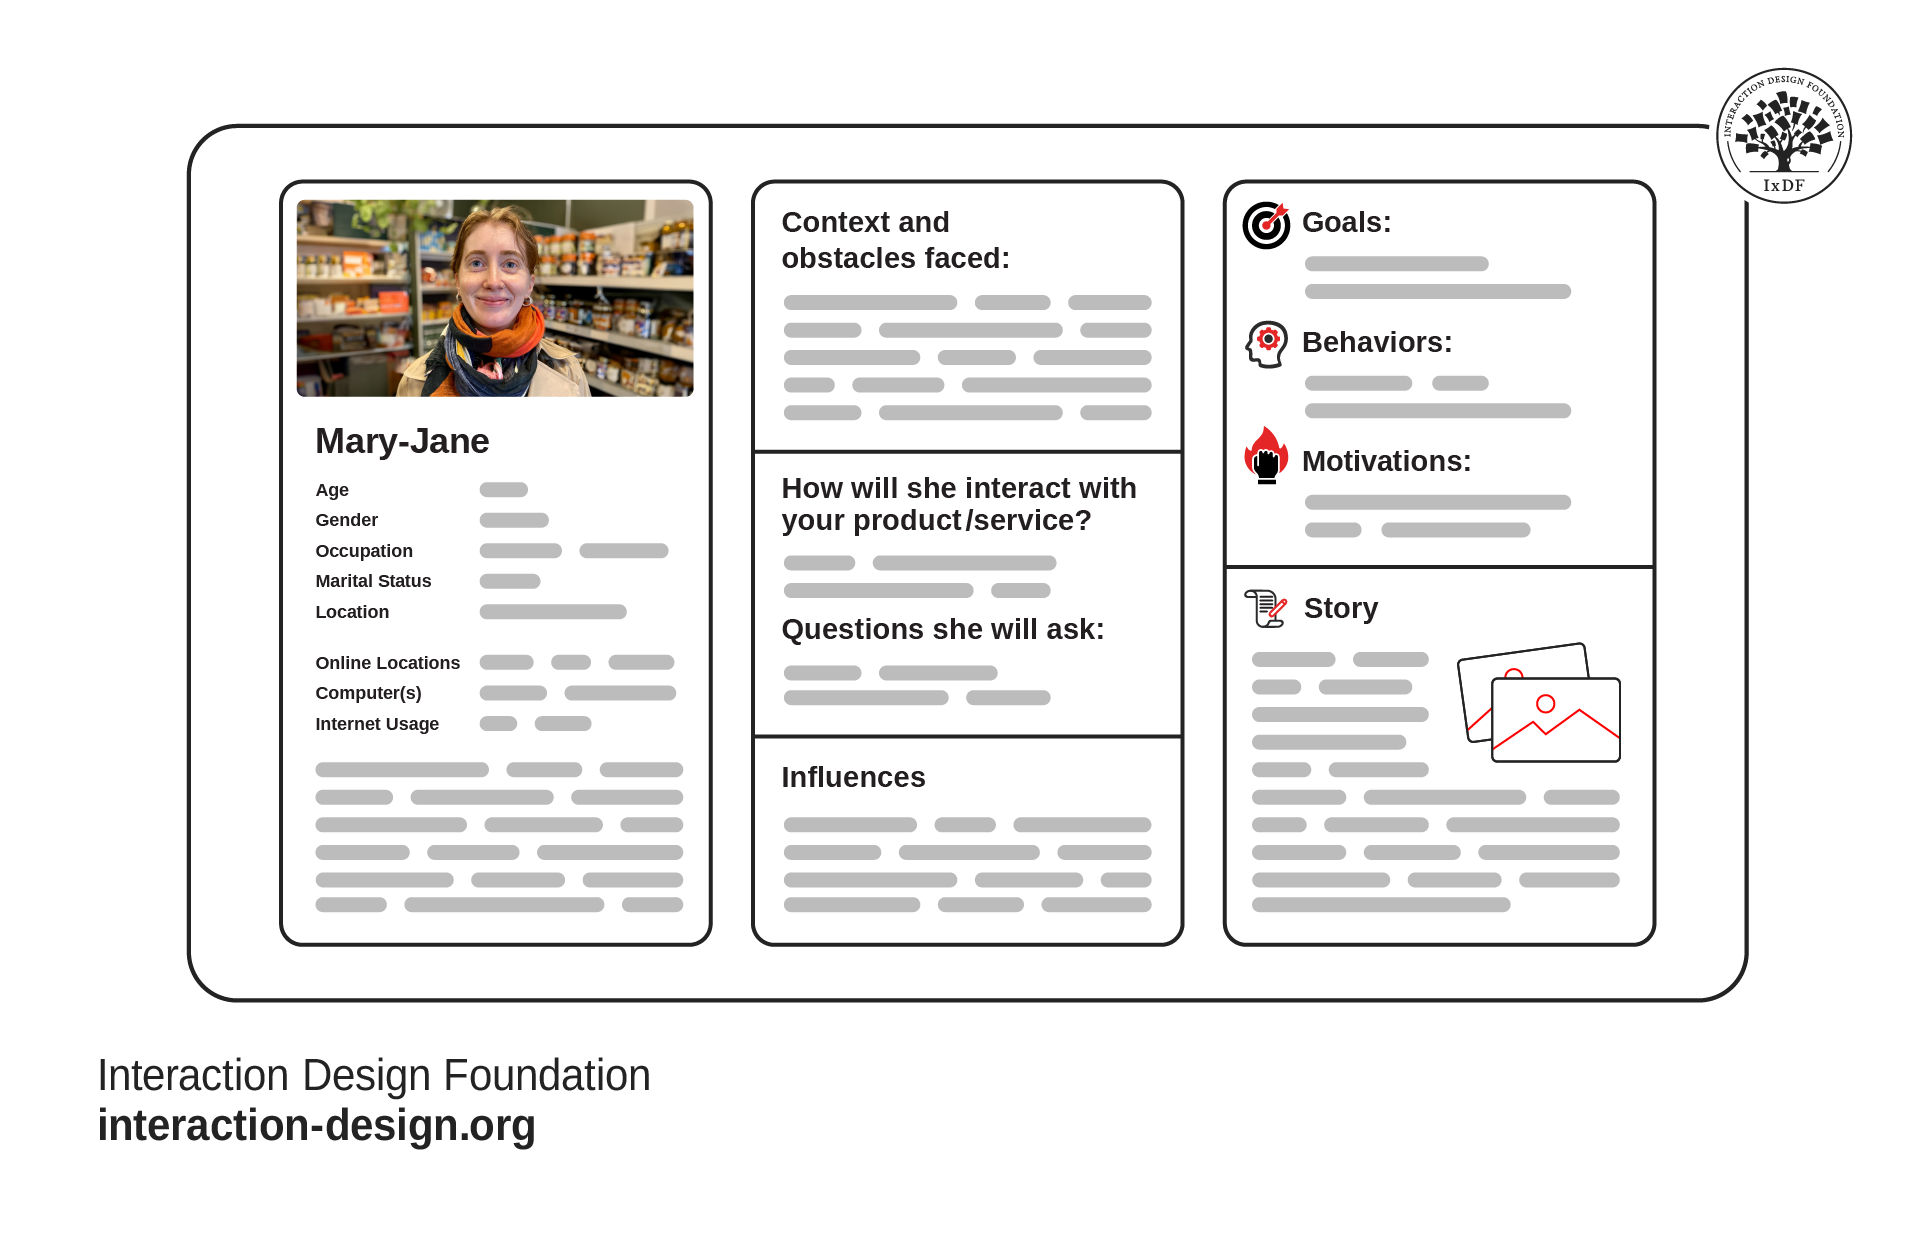
Your persona information will come directly from your user research. Look at the patterns you discovered through your affinity diagrams. What do your users have in common? For example, do they prefer onboarding experiences with little handholding? Are they worried about missing out on important features? What tasks do they use your app to complete, and where do they complete them?
© Interaction Design Foundation, CC BY-SA 4.0
Every detail in your persona should serve a design purpose, so avoid overloading it with irrelevant hobbies or quirks.
To get your persona to paper fast, you can download our free persona template. It includes all the sections you need to create effective personas that guide teams and get results. Plus, it includes an example persona and a detailed description of what each section should contain.
In some cases, such as designing for trauma survivors or patients with chronic illness, you may need extended personas. These offer a richer backstory to build deeper empathy, but be cautious: make sure added details are relevant and respectful.
3.2. Use Only One Persona for Small Projects
For most small to medium-sized projects, one well-researched primary persona is often enough. If you identify variations in needs or behaviors, you can create one or two secondary personas—but only if those differences meaningfully impact design decisions.
For large projects with multiple groups of users you wish to target, you can use multiple primary personas. For example, in a hospital, you have medical staff, administrators, patients, maintenance, and many more.
However, avoid creating multiple personas based solely on abilities, skill level, or technical proficiency. That’s a separate accessibility and usability consideration, not a persona issue. William Hudson explains more in this video:
Show
Hide
video transcript
- Transcript loading…
Step 4. Get Your Personas Used (and Adored!)
Even the best personas are useless if they collect dust. Here is how to make them work.
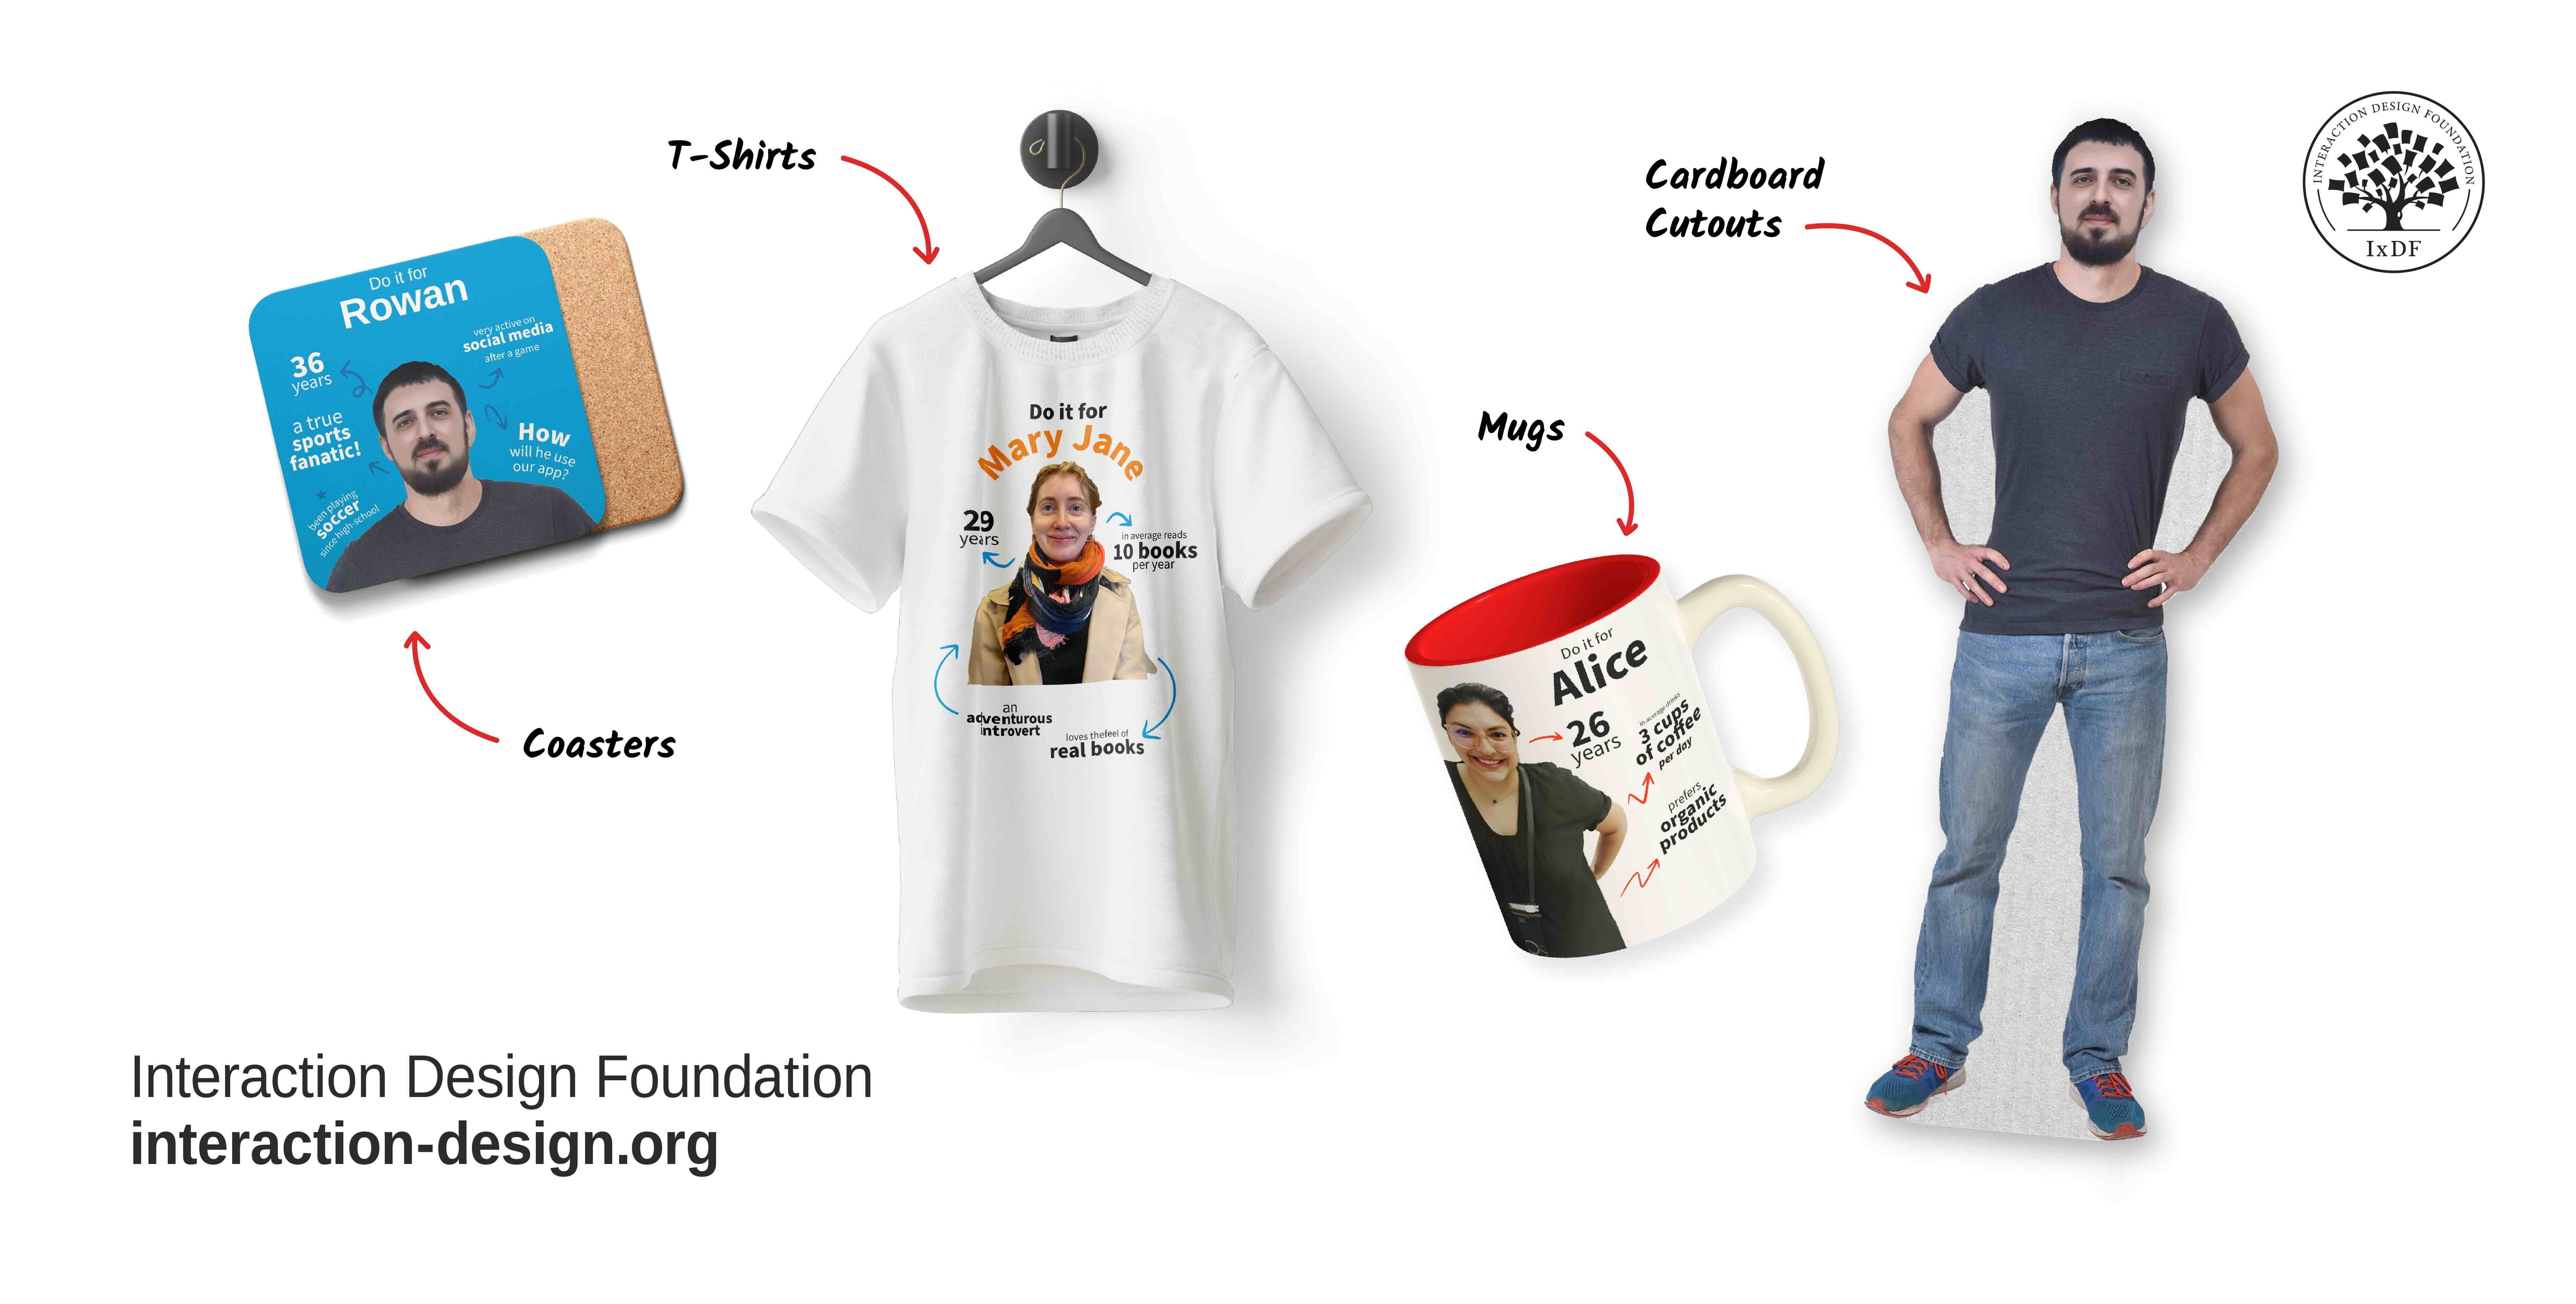
Make your personas visible: Give them a presence in your team space—print them out, place them on your notice board, or even make cardboard cutouts to bring to meetings. This may seem a little silly, but it’s an excellent way to constantly remind your team who they’re creating for.
![A collection of persona merchandise that features images and key behaviors. There is a coaster, a t-shirt, a mug, and a cardboard cutout.]()
Get creative with your personas. The more your team is reminded of them, the more they’ll empathize and consider their needs in everything they do.
© Interaction Design Foundation, CC BY-SA 4.0
Insert them in stories of use: These come in various forms, including use cases, user stories, and persona stories. They are stories of different lengths that tell your team how your persona interacts with your solution and what they want to do.
Evaluate designs against them: Once you have a prototype, mockup, or even just an idea, evaluate it against your persona. Does it meet their needs? Does it suit their behaviors?
Include them in onboarding for new team members: Your personas should be the focal point of all your design efforts. It’s like having a user come and sit next to you every day and tell you what works for them and what doesn’t. Therefore, they should be introduced to new team members as an important part of their new role.
The Take Away
Personas are powerful tools when built and used correctly. They promote user-centered design, aid in decision-making, and align teams around a single focus. Follow this step-by-step method to build personas and get the best out of them:
Start with research, not assumptions. Use grounded theory, user observations, and triangulation to reveal users’ true user behaviors and needs.
Use affinity diagramming to make sense of your research data. Complete this activity with your team to get everyone onboard.
Create minimal viable personas based on your research. Only include the details necessary to guide your design and product development. Excessive detail makes personas harder to adopt and use.
Promote and apply your personas throughout your design process. Make them visible and put constant reminders in view of your team. Insert them in stories of use and evaluate your designs against them.
This process isn’t just about creating a document—it’s about creating alignment. Personas help your team stay focused, avoid feature creep, and build solutions that solve real problems for real people. When you get these skills, you’ll stand out amongst your peers, prove AI can’t replace you, and grow a fulfilling career.
References and Where to Learn More
Want to know more about personas and how to use them effectively? Personas and User Research: Design Products and Services People Need and Want will show you how to gather meaningful user insights, avoid bias, and build research-backed personas that help you design intuitive, relevant products. You’ll walk away with practical skills and a certificate that demonstrates your expertise in user research and persona creation.
Read Alan Cooper’s seminal book that introduced personas to interaction design, The Inmates Are Running the Asylum.
Benefit further from Maddie Brown’s experience with personas in the NNG article, Avoiding 3 Common Pitfalls of Affinity Diagramming.
Deepen your knowledge of these key concepts with the following articles:
Get research-backed insights with Nielsen Norman Group’s Personas: Study Guide.
Discover the difference between controlled and naturalistic observation, plus all the best practices in our article, How to Conduct User Observations.