It’s tough to write beginnings, isn’t it? It can be especially difficult to write the introduction of your UX case study, since it will determine the success of your job application. What should you include? How do you make a good first impression? Fret not! We’ve got you covered here. Your introduction should include 3 key components: a design problem that involves a business need, your approach to solving the problem as well as your role in the project. Let’s go through what exactly you should include in your UX case study’s introduction. We’ve even got a step-by-step exercise you can follow!
What’s the Role of Your UX Case Study’s Introduction?
Before we begin writing our UX case study introduction, we should first understand the role it plays. We can divide your UX case study into 5 parts, based on the German playwright Gustav Freytag’s 5-part dramatic structure:
Exposition: Where you introduce key information and set expectations for the rest of the story.
Rising action: Where you bring the reader through your strategies that lead to a climax.
Climax: The peak of your story, a “wow” moment where, for instance, you uncover an unexpected insight.
Falling action: Where things fall into place and lead to the final results.
Resolution: Where you reveal the final product of your project and round your story off in a satisfying conclusion.
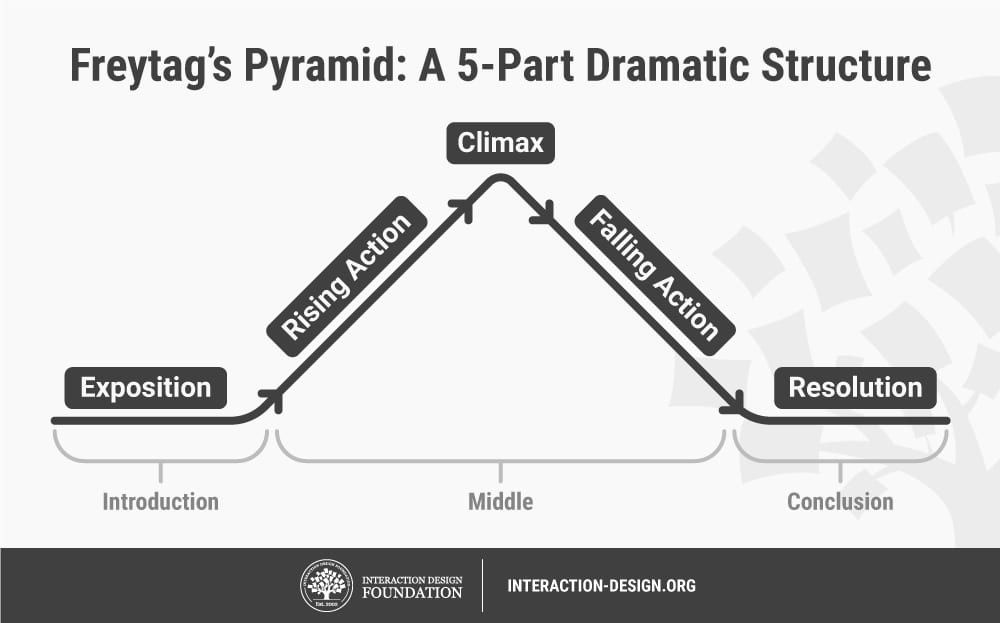
Your UX case study should follow Freytag’s 5-part dramatic structure. Author / Copyright holder: Teo Yu Siang and the Interaction Design Foundation. Copyright terms and license: CC BY-NC-SA 3.0.
We can group Freytag’s 5 parts into 3 main sections: an introduction, a middle and a conclusion. As you can see from the image above, your UX case study’s introduction should include “exposition”, where you set the stage for the rest of your story to happen.
In other words, your UX case study’s introduction should let your recruiters know the problem you’re solving, the strategies you adopt and your role in the project. This way, you’ll provide all the context your recruiters need to evaluate your skills and appreciate what you’ve achieved in your project.
3 Essential Components of Your Case Study Introduction
Your UX case study introduction should thus contain:
A problem statement: Highlight the key problem you’re going to solve—preferably in relation to business objectives or metrics. What motivates you to take on this problem? What are your thoughts and feelings about it? If you’re revamping an existing webpage or app, then show some screenshots of how it looked and point out the problems.
Your solution: Run through your approach to solving the problem. Give your readers a taste of what to expect at the end of your story—what deliverables or final output will you produce?
Your role: Let your readers know how you have contributed to the project. Your role in the project should be linked to the job you apply for. For example, if you apply for a UX researcher job, then ideally you should have played a UX research role in your case study project.
Your introduction should be 4–5 sentences long. This ensures that your UX case study is short and sweet, since recruiters usually spend no more than 5 minutes reading your case study. However, as we’ll go through below, you shouldn’t worry about word count when you begin to write your introduction. Focus on content first, then cut down on words later.
Next, we’ll go through the best way to write the problem, the solution and your role in your introduction. After that, we’ll take a step-by-step walkthrough of how to write your introduction, so you can get started immediately. Let’s begin!
1. How to Write Your Problem Statement
Your problem statement should explain what you’re trying to solve, provide you with a strong motivation and outline the main challenge involved. It should read something like: “I wanted to [solve this problem], because [of my motivations]. This problem is particularly challenging since [describe my main challenge].”
Tie your problem statement to a business problem whenever possible. Remember, recruiters hire you to bring value to a business. Show you understand that a designer’s role is not only to provide a great experience for users but also to create value for an enterprise.
Here’s a problem statement that’s tied to a business problem:
“We launched a feature ‘X’ 2 months ago, but realized that many people were not using it because they didn’t know it even existed. I wanted to increase its discoverability, because ‘X’ will help open a new stream of revenue for our app.”
The bolded part in the example above provides a strong link between your project and the business value it provides. Compare this with the following bad problem statement:
“I set out to do a complete visual overhaul of the Podcast App so that it looks fresh and provides an exciting user experience.”
Notice what’s missing? This problem statement lacks a business-oriented “why” to it—as a result, the designer has an unclear (i.e., poor) motivation. Why did the designer do a visual overhaul of the app, other than to make it look “fresh”?
Let’s improve this problem statement by adding a compelling, business-centric motivation:
“The Podcast App is a leading podcast app, but its design looks outdated compared to its competitors. With such tight competition in the industry, a visual overhaul is long overdue. I thus set out to reimagine the Podcast App so it can maintain its lead in the years to come.”
See how much more compelling it sounds? Now you understand why it’s so important to redesign the app—its market position will likely be overtaken by a better-designed competitor!
Of course, a personal motivation works, too. For instance, you might have designed a website to solve a personal problem you face every day. Personal motivations can be equally powerful drivers of your UX case study. However, we encourage you to include at least one case study in your portfolio that has a business-oriented motivation, because that’s what recruiters love to see.
Lastly, don’t be afraid to show your emotions! Were you nervous to take on the project because of its high stakes or anxious because it was the first project you led? Showcase your humanity in your problem statement. A bit of vulnerability can make your story powerful and relatable.
2. How to Write Your Solution
In the solution portion of your introduction, give your readers a taste of what to expect. Since this is just the introduction, you don’t have to fully describe your design process or solution. Instead, briefly mention the design process you used.
Mention the key deliverables of the project. This serves as the light at the end of the tunnel, so readers know what to expect at the end. If you’ve created an interactive prototype, make it known right at the introduction to your UX case study.
Here’s a solution statement in the introduction of a case study:
“We ran 2 weeks of design sprints based on the design thinking methodology, which includes 5 stages: empathize, define, ideate, prototype and test. We eventually created and shipped a fully functional app where people can learn English in as little as 15 minutes a day.”
In the example above, we highlighted the design process we will use—namely, the design thinking methodology. We also briefly went through the 5 stages of the design thinking process and mentioned that the final product we created was a functional app. In 2 sentences, the reader can get a holistic summary of the project.
3. How to Write About Your Role in the Project
This is one of the most important parts of your introduction! If you remember just one thing, let it be this: clearly state your role. Your project might be amazing, but if the recruiter does not know how you’ve contributed to the final results, they’ll not know whether to hire you. In a field of equally qualified candidates, it can make that final difference as to whether you get invited to the interview or not. So, remember to include what you’ve contributed (and what you did not contribute) to the project.
As UX designer Mike Curtis says, you’ve got to have a balance of “I” and “we” in your UX case studies. This means that in your introduction, you have to present yourself as a team player and also make it clear what you bring to the table. Your recruiter is going to hire you, not your team!
There’s a balance where you need to stay in the spotlight, but gracefully. So, don’t be overly generous with mentioning others (which looks fake), but don’t make yourself seem like a lone wolf. Recruiters like to see self-confident designers who can work well in teams. What if you’ve worked alone on a project? In such a case, give credit to anyone who’s helped you along the way—for instance, someone who critiqued your design.
At the same time, make sure your role in the project is crystal clear. For instance, if you helped to conduct user research and usability tests in a project, you could write something like:
“I conducted initial user research and defined key personas, and also helped evaluate our designs through usability tests before it was launched. The amazing Victor Johnson helped create the interaction design of the final product.”
A 5-Step Guide to Writing Your UX Case Study Introduction
Still feeling a little lost? Don’t worry, we’ve got your back. Follow these steps, and you’ll quickly get past the “blank page” wall that so many of us face when we start to write!
Step 1: Open an Empty Word Processor
Go ahead and open your favorite word processor.

Ah, the empty page: one of the most intimidating enemies of a writer. Author / Copyright holder: Google. Copyright terms and license: Fair use.
Step 2: Create 3 Subheadings
In your document, create the following subheadings:
The problem
The solution
My role
As we’ve discussed above, these are the 3 main components you should include in your introduction. When you create the subheadings, you’ll not only guide yourself but also quickly move away from the blank slate of an empty document.

See? It’s much better already! Write down these subheadings to fight the “blank page” monster. Author / Copyright holder: Google. Copyright terms and license: Fair use.
Step 3: Fill the Subheadings Up
Start filling the 3 sections. Look at our guidelines for each section above or download our nifty template at the bottom. Type in full sentences. And, for the time being, don’t worry about your word count.
Remember to think about the visuals you can add to your introduction, too! For instance, if your case study is about a redesign of a page, it’ll be great if you include some screenshots of the existing design to highlight the design problem.
We’ll create a hypothetical UX case study introduction so you have a reference. In this made-up scenario, we want to write about a project where we created a new design system for a web-based app. We’ll focus purely on copywriting since we don’t have any visuals to provide (it is, after all, our hypothetical project), but you should also pay attention to screenshots and images in your introduction.
Here’s a rough draft of the introduction:
The problem:
[Product] is one of the most established English-learning platforms in the world. However, the design of [Product] looks increasingly outdated when compared to its competitors, and parts of its user experience fell short of expectations. An overhaul feels long overdue and will help ensure that [Product] can remain competitive in the long run.
The solution:
We set out to completely overhaul [Product]’s look and feel and created a unifying design system that merges usability guidelines and aesthetic appeal. These changes impacted every corner of [Product]’s website, including key interactions.
My role:
I led the entire project and worked on creating the visual design of the new design system. I also revamped the UX of key pages and worked on motion design, while my developer colleagues applied their magic to help implement the entire project.
Step 4: Refine Your Draft
As you might have noticed, our first draft is a little long. Remember that we’re aiming for 4–5 sentences in the introduction. At this stage of the process, refine your draft. Cut down on words and improve your writing. Use the active voice and write in a conversational style. Add images and other visuals, if you haven’t already done so.
Here’s a second iteration of our introduction, this time polished and shortened to 5 sentences:
The problem:
[Product] is an industry-leading English-learning platform, but its design looks outdated compared to its competitors and parts of its user experience are unpolished. An overhaul is overdue and will ensure [Product] remains competitive in the long run.
The solution:
We set out to create a brand-new design system to ensure [Product] encompasses best-in-class usability and aesthetics across all corners of the app.
My role:
I led the project and worked on all aspects of the new design system, including its visual, UX and motion design. I also revamped the UX of key pages while my developer colleagues helped implement my designs.
Step 5: Remove the Subheadings (Optional)
You can choose to leave the subheadings (The Problem, The Solution, My Role) if you like, but we feel they aren’t necessary and should be removed. In any case, you’re done! Congratulations on writing a great introduction for your UX case study!
Here’s what our hypothetical introduction looks like:
[Product] is an industry-leading English-learning platform, but its design looks outdated compared to its competitors and parts of its user experience are unpolished. An overhaul is overdue and will ensure [Product] remains competitive in the long run.
We set out to create a brand-new design system to ensure [Product] encompasses best-in-class usability and aesthetics across all corners of the app.
I led the project and worked on all aspects of the new design system, including its visual, UX and motion design. I also revamped the UX of key pages while my developer colleagues helped implement my designs.
In 5 sentences, our introduction:
lays out the problem we want to solve;
provides a business-oriented motivation behind the project;
briefly describes the scope of the project and its end result; and
clearly delineates my role in the project while acknowledging the support of my team.
Do a few more rounds of iteration on your introduction if you have time. There’s always room for improvement! Our sample introduction, for instance, did not contain any emotional aspects of taking on the project. Could we include that while keeping the word count at 5 sentences?
Download Our Step-by-Step Guide to Get Started Now
We know that it can be difficult to start a writing project. But the best way to get started is to do it—now! Download our step-by-step template and start working on your UX case study today:

As you write your UX case study’s introduction, know that it will mark an important milestone in your lifelong journey of writing. That’s because you’ll not only create a key artifact that will help you get a new job but also hone your craft in one of the most important elements of design: writing.
Good luck, and we hope you’ll fall in love with writing!
The Take Away
Your UX case study’s introduction should set up the context required for the reader to understand your project and evaluate your skills. Given that, you should include these 3 components:
The problem you’re solving in your project. This should include your motivations for taking on the project, which should preferably involve a business need.
The solution to the problem. You should bring your reader briefly through how you’ll solve the problem, and mention the final deliverables you’ve produced.
Your role in the project. You’ll rarely be the only contributor to a project, so you must be sure to highlight the specific things you brought to the table and give credit to your team-mates where it’s due.
References and Where to Learn More
If you need a quick lesson on how to write effectively, check out our handy guide here.
Mike Curtis shares 10 tips on how to write great UX case studies, including the need to look for “I” and “we”.
Hero image: Author / Copyright holder: Kaitlyn Baker. Copyright terms and license: Unsplash License.